TOP TRIP TIPS

Hello everyone!

Rese and Ry embarked on an adventure to the beautiful city of London. We spent a short amount of time there- only four days, but we packed those days to the brim! I wanted to share some tips to make your trip to London (or any destination) run smoothly.

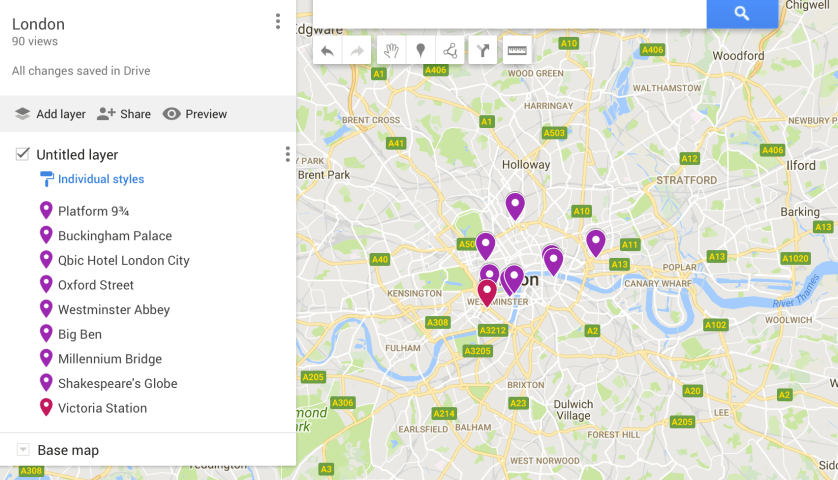
  1. Use Google Maps to create a visual with pins on locations you want to hit up.
    1. Open Google Maps and select the menu option on the left hand corner
    2. Select “Your Places” and then “Maps”
    3. Create a map
    4. Search sights that you want to visit and pin them

It extremely useful to have a visual with all the sights I planned on visiting and the distance they were from each other. I was able to see which sights I am able to walk to and which order would be the most efficient. I also pinned my hotel on the map to see the distance I would have to travel from the hotel to the sight. You can select different colors to pin your spots as well. Also, you can use this tool to search the closest Pret A Manger cause that’s important. Here’s mine for our first day in London.

Screen Shot 2018-04-03 at 9.54.37 AM.png

2. Go to Pret A Manger. 

This is a sandwich chain, but they serve much more than sandwiches. Their coffees and treats are delicious! They also have amazing healthy options for each meal of the day, like a Golden Latte made of turmeric. I recommend their porridge (I promise it is not bland and ordinary). This shop is all over London and in some places of the USA, but no where close to where I live.

3. Use Google Maps to navigate the Underground and the Bus System. 

Although I was able to read the tube maps as my travels went on, they can still be confusing for someone who never uses public transit in their hometown. Google Maps offers clear instructions on which stops to get on and off. Make sure to screenshot them since there won’t be service underground. Notice the colors of the tube line and the number of which bus to board. Rese and I found the bus system to be much more comfortable to ride and it was nice to look out the windows (and no stairs like the underground haha).

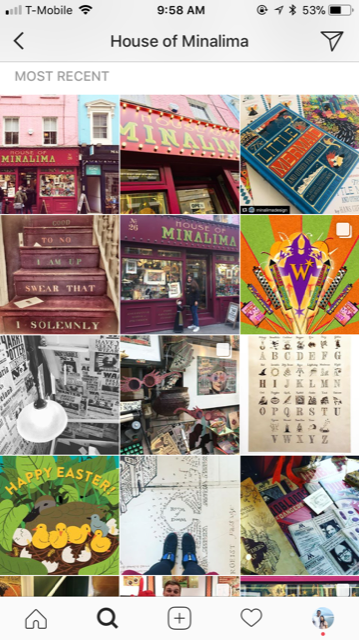
4. Use Instagram to research 

So when you google a top travel spot, you see stock photos and those aren’t truly what the destination will look like. Instagram’s “Places” will show you accurate photos from Londoners to everyday travelers. It also helps you gage the weather and fashion choices you should make when you pack. Superficially, it also gives you good ideas for a good ‘gram post #doitforthegram, haha. For example, I wanted to visit House of MinaLima (Harry Potter graphic designer’s museum/ exhibit) but I didn’t know what they offered until I check the Instagram location. So from the Instagram screenshot below, I could see they have cool staircase and a Marauders Map on the floor.

IMG_3327.PNG

5. Google Flights

is a great search engine. It’s clean, doesn’t have a million ads, and you can search the cheapest dates to travel.

London: Why and What

This is a blog post about how we ended up in London for only two days but had an absolute blast. I was in a dilemma when I canceled my study abroad trip and was left with a one way ticket to Gothenburg, Sweden. Of course, I had bought the cheapest ticket being a student and all so there was no refunds but I didn’t want that ticket to go to waste. I somehow convince Rese to go on a trip with me…. the plan was simple. Go to Sweden a few days and have fun, but wow money was an issue. Sweden’s hotels and airbnbs are EXPENSIVE and while searching for flights for Rese, we saw how affordable flights to London were. Thus, our trip to London was born after I spent hours making an organized spreadsheet for Sweden with flights, sights, and kites (jk but it rhymed).

I still had my GOT ticket so I booked a one way ticket from Sweden to LGW, London, UK with Norwegian Air for only $30 that departed two hours after I landed. I had qualms that I would miss this flight, but I actually had a lot of time to spare. The only odd bit was that the border office pointed out my arrival and departure date were the same, but it was fine. Rese and I strategized for me to make my flight since I only had a backpack on me and no luggage. Rese would check her luggage and we would share. This way I could avoid baggage claim and ensure I find myself on the departing flight. Before we traveled, I was pretty anxious I would be stuck in Sweden with no hotels nor plans and Rese would end up in London alone. However, it all went well so it’s possible to buy separate tickets to get you to your final destination. It is worth noting that GOT is a very gorgeous airport with modern and clean designs that pays homage to IKEA.

Ok, now that’s explanation is done with- here is what we did in London. Rese and I met up in LGW at around 8AM and we took the train to Central London and then took the underground to our hotel. We stayed at QBIC Hotel (after searching on Google for “clean, affordable, nice hotel London” and it worked!). It was a very hip and cool hotel in Shoreditch, which is quintessentially the hipster, alternative part of London. We left our bags, changed (I had traveled for over 24 hours!) and made our way to Oxford Street.

THE ITINERARY 

Day 1

  • Oxford Street
    • Primark
    • Liberty
  • Lunch at Wagamams
  • Blacklock for Sunday Roast

Day 2

  • Platform 9 3/4
  • St. James Park
  • Buckingham Palace
  • Big Ben
  • Millenium Bridge
  • St. Paul’s Cathedral
  • Shakepeare’s Globe
  • Fish and Chips Detour
  • Oxford Street
    • Afternoon Tea at Harrods
    • Primark

Day 3

  • Greenwich
    • English Breakfast
    • Prime Meridian
  • National Gallery
  • Oxford Street


Icelandic Layover Adventure

Layovers are usually boring and the worst part of traveling–it’s another pitstop that is just delaying your trip to your final destination. Most of the time it’s spent sitting in an airport doing pretty much nothing. I didn’t think i’d ever actually chose to have a longer layover during my trip. Instead of the usually 2-3 hour layover, my sister and I chose the 7 hours stop in Iceland on our way back from our trip. During the 7 hours, we were able to have an experience like no other–the BLUE LAGOON!!

img_1266

Our flight landed at 8:45AM and we were on the us to the Blue Lagoon by 9:00AM-so crazy. The bus trip from the airport to the lagoon was about 30 minutes. Our entrance time to the Blue Lagoon was for 12:30PM, so we had to wait a little. But it was no detriment to our fun. There was so much to see and so many  pictures to take all around the area. we were surrounded by nature–amazing lava rocks and beautiful blue milky waters.

img_1273

The people at the Blue were super nice and let us in about an hour and half earlier than our ticket time. So once we were in the blue lagoon, we got our wristbands, towels and went to the locker rooms. The wrist band were used to access and lock up the lockers and purchase drinks in the lagoon.

img_1261

The weather in mid August was a little chilly, but the waters were amazingly warm. The lagoon was surrounded by mountains, so the scenery was beautiful. In addition to the lagoon, there were also in water massages,  waterfalls, saunas, steam rooms, and face masks!